Installing a Fixed-Mount VHF Radio
Installing a Fixed-Mount VHF Radio
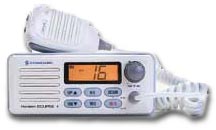
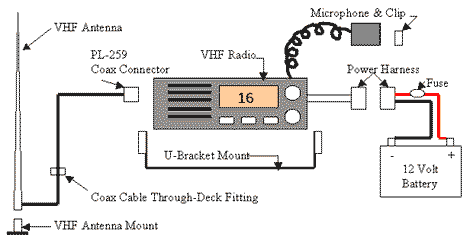
Hanging from the T-top on a new 21-foot center-console fishing boat in the middle of installing a VHF antenna, a coworker brought me a portable phone. On the phone was my editor, wanting to know what my article was going to be about for the upcoming week. "Well, John, I'm in the middle of installing a VHF radio right now, I haven't really thought about next week's article." I replied. "Why don't you write about installing a VHF radio?" "Good idea!"  The ability to talk with other boaters is not only neat and useful, but aside from your life jacket, a VHF radio is perhaps the next most important piece of safety equipment on your boat. Many folks are taking their cell-phones to sea which is not a bad idea, but if you really want to know where the fish are biting best, raise a draw bridge, enter a harbor and find a slip or call for help if you're in distress, a VHF is essential. Consult the West Advisor for more detailed information on how VHF radios work and a description of features, but if you want to save a few dollars and install a radio yourself, read on! The ability to talk with other boaters is not only neat and useful, but aside from your life jacket, a VHF radio is perhaps the next most important piece of safety equipment on your boat. Many folks are taking their cell-phones to sea which is not a bad idea, but if you really want to know where the fish are biting best, raise a draw bridge, enter a harbor and find a slip or call for help if you're in distress, a VHF is essential. Consult the West Advisor for more detailed information on how VHF radios work and a description of features, but if you want to save a few dollars and install a radio yourself, read on! First off, realize that hand-held VHF radios will allow normal communication within a certain range--about a few miles. Antenna height is the single most determining factor for range. VHF radios operate on a "line of sight" principle, which means the higher your antenna, the better transmitting and receiving range you can obtain. Therefore, installing a taller antenna or even a short antenna on a high point of your boat will give you better range than if you're in the cockpit with your handheld radio. A fixed mount radio will connect easier to an external antenna and will also give you more power. More power (watts) does not necessarily add to your range significantly, but will allow your voice to be heard if there is a lot of radio traffic. A twenty-five watt signal will overpower or "step on" a 5 watt broadcast. Now that you have decided to install a fixed mount radio, lets take a look at all the components making up the system. When you buy a radio and open the box, you will only find the radio, a U-shaped mounting bracket (usually with mounting screws included), microphone and mounting clip (also usually with fasteners included), power harness with in-line fuse and the Owner's Manual. That is a good start, but to have an operational radio, you will also need to acquire the following: - VHF antenna-many types and sizes are available, consult the West Advisor.
- Antenna mount-mounts are also quite diverse and allow for a variety of options.
- Fasteners and sealant to mount the U-bracket, antenna mount and microphone clip to your boat If not included with the antenna, a PL-259 coax connector to connect the antenna to your radio.
- If you are not handy at soldering, I suggest the use of an EZ connector. These puppies really take the headache out of attaching a coax connector.
- Coax cable through-deck fitting. You need a way to pass the antenna coax from above deck to below while remaining water tight.
- Terminal ends for the power harness to connect to either your battery, a distribution panel or switch. I highly recommend waterproof ring terminals; these will give the best performance over the long run. Loose and or corroded fittings are the leading cause of bad VHF performance.
 Now that you finally have all the pieces of the puzzle gathered, it's time to figure out where they all go. I strongly advise actually sitting in your boat and place the various items in different locations to check for accessibility and how they might fit into your boat's space. Also remember that VHF radios are effected by electronic noise from items like depth sounders and alternators. Be careful not to route your cable near your depth sounder's transducer cable or any other cables for that matter-not always an easy task. Of course, you have to think about items that your radio might affect. For instance the VHF radios have highly magnetic components and can drastically deviate your compass. Now that you finally have all the pieces of the puzzle gathered, it's time to figure out where they all go. I strongly advise actually sitting in your boat and place the various items in different locations to check for accessibility and how they might fit into your boat's space. Also remember that VHF radios are effected by electronic noise from items like depth sounders and alternators. Be careful not to route your cable near your depth sounder's transducer cable or any other cables for that matter-not always an easy task. Of course, you have to think about items that your radio might affect. For instance the VHF radios have highly magnetic components and can drastically deviate your compass. For best performance, mount your antenna at the highest point on your boat. T-tops make excellent places to mount antennas. A rail mount allows mounting on a pulpit, handrail, or T-top and a surface mount allows mounting to the deck or side of a cabin. Remember, antenna height is key, so try to get it up as high as possible. There are considerations that countermand this rule. For instance, a fisherman who does a lot of casting might find an antenna to be in the way. Using a shorter antenna and sacrificing some range might be a consideration, but an alternative is to use a ratchet mount, so when you want to cast, you can lower the antenna down and out of the way. The best order I have found to install an antenna is to: - Identify where you want to mount the antenna
- Drill holes if needed-use sealant or be sorry!
- Thread the mount into the antenna base-this prevents the coax from getting wound up around the antenna
- Attach the mount to the boat
- Route the coax to the radio
- Attach a through-deck fitting if necessary when routing the coax cable
- If you have extra coax, don't coil the cable! It is best to cut the coax to the desired length. Remember: measure twice and cut once!
- Follow the instructions included with the PL-259 connector and attach to the coax.
Next, drill the holes for the VHF radio mount. Apply sealant and attach the mount to the boat. Make sure you have allowed plenty of room behind the radio to easily plug the PL-259 connector and your power harness into the radio. Also, you may find you want to mount the microphone clip away from the radio and this is a good time to make sure everything fits together nicely and is easily accessible. Now you need to run power to your radio. Depending on the type of boat you have will determine how you want to connect your power harness to your 12-volt system. The most basic set-up is to connect directly to the battery. This might be fine for smaller boats, but consider running your power harness to a distribution panel or at least an "On/Off" switch. Please use ring terminals when connecting your radio to the power source. Ring terminals are less likely to lose their connection and by using heat-shrink waterproof terminals, you'll reduce the chance of the terminal pulling from the cable and slow the onset of corrosion. Next make all your connections and test the radio by first turning on the power. Switch the radio to the weather channel (WX) and test for reception. The weather should be quite clear and if not, then you might not have made the best connections. Go back and check every connection. With the weather coming in crystal clear, go ahead and test the broadcasting capabilities. Tune to the acceptable hailing channel and simply say, "Any vessel, any vessel, any vessel…this is the yacht and request a radio check." If another skipper is in your vicinity and has his radio on, you will probably get a response with a description of your signal along with the location he is receiving your signal. Of course there might not be anyone listening, so give up after a few tries and say, "no contact made" before signing off. The solution to determine if your radio is not performing properly or if there just wasn't anybody listening is to find another VHF radio along with a friend, tune it to the same channel and test again. If you are not broadcasting a strong clear signal, then check all your connections again. Also, try testing your radio with all your electronics and engine turned on, that way you will be able to tell if your are experiencing any interference. Work out all the bugs while still at the dock and you'll be glad when you go to use the radio for the first time on the water. I have lost count how many VHF radios I've installed, but do remember the first one. I think it took me about two days, because I didn't realize how easy it was and tried to make a mountain out of a molehill. Today, I can do a clean professional installation in about thirty minutes; however, I still spend at least the same amount of time if not more determining the best location for the radio. So count on at least an hour to sit in your boat pondering location and then another half-hour to install the radio. You don't have to talk on your VHF radio to enjoy using one. My mom loves to listen to the chatter of the fisherman or the ore boat and ferry captains on Lake Erie. After you have installed your first radio, you'll wonder why more folks don't have one and why they would ever pay to have one installed! However, let's let that be our little secret and go ahead and play up the fact that you're pretty handy with rigging your boat. Read up on radio etiquette and learn how to use your radio and begin to enjoy a new dimension to your boating. Until next time,
Happy broadcasting! 
|